Mastering Backend Development: The Ultimate Guide to Building a Nodejs Blog App Server. Part - 2
In this part, we will be covering endpoints to create, update and delete posts
In the previous part of this blog series, we discussed the basic setup of our blog app's backend. Now, let's dive into the implementation of the endpoints responsible for creating, updating, and deleting blog posts. These functionalities are crucial for allowing users to manage their content effectively.
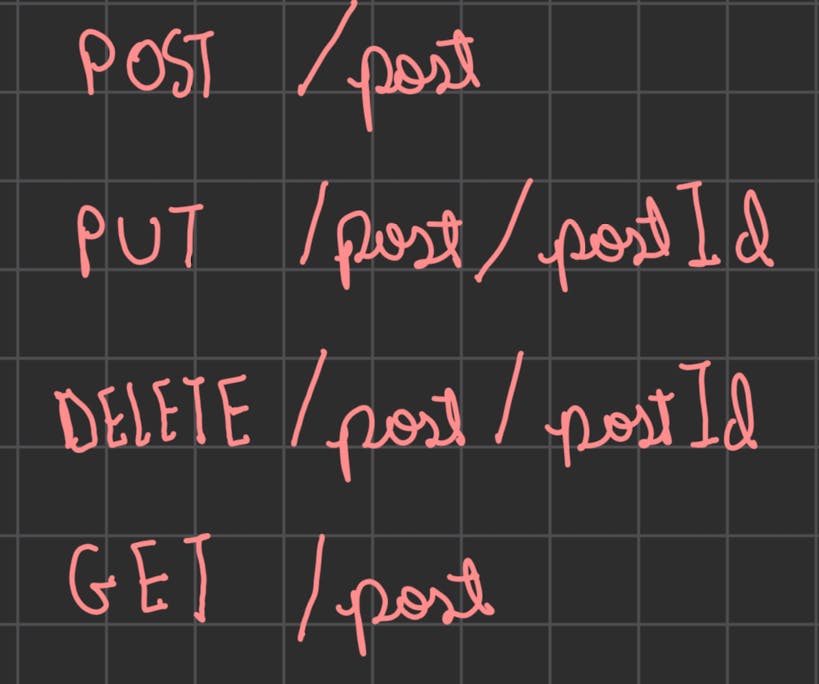
Below are the list of routes we will add.
POST /post - Add posts using this endpoint.
PUT /post/postId Updates a specified post.
DELETE /post/postId Delete a specified post.
GET /post Shows all the posts.

The file structure:
- app.js (or index.js)                # Entry point of your application
- models/                             # Directory for MongoDB models
  - User.js                              # User model definition
  - Post.js                              # Post model definition
- routes/                             # Directory for route handlers
  - authRoutes.js                        # Authentication routes
  - postsRoutes.js                       # Post-related routes
  -profileRoutes.js                      # Profile, like, bookmarks routes
- controllers/                        # Directory for controllers
  - authController.js                    # Authentication controller
  - postController.js                    # Post controller
  - commentContoller.js                  # Comment controller
  - profileController.js                 # Profile, like, bookmarks
- middlewares/                        # Directory for middleware functions
  - authentication.js                 # Authentication middleware
Create Posts
To enable users to create new blog posts, we need to define an endpoint that accepts the necessary data and stores it in our database. In our implementation, we have designed the endpoint POST /posts for this purpose. This endpoint accepts a JSON payload containing the title, content, tags and author of the blog post.
Once the post is successfully created, the endpoint returns a response with the unique ID. This allows users to track their posts.
const createPost = async (req, res) => {
  const { title, content, tags } = req.body;
  const author = req.user.username;
  const user = req.user;
  console.log(user);
  try {
    const post = new Post({ title, content, tags, author });
    await post.save();
    //console.log(user._id);
    //console.log(user.customId);
    await User.findOneAndUpdate({ username: user.username }, { $push: { posts: post._id } });

    res.json({ message: 'Post created successfully', postId: post._id });
  } catch (error) {
    res.status(500).json({ message: 'An error occurred while creating the post' });
  }
};
We create a post and save it in the database using await post.save();
await User.findOneAndUpdate({ username: user.username }, { $push: { posts: post._id } }); helps in pushing the blogpost id to an array present in userSchema so we can keep track of the blogs written by a certain user.
Update a certain post
Allowing users to update their blog posts is essential for keeping content up to date. To achieve this, we have implemented the PUT /posts/:postId endpoint. This endpoint accepts a JSON payload with the updated title and content of the blog post.
By specifying the :postId parameter in the endpoint URL, we can identify the post to be updated. After a successful update, the endpoint responds with the updated post's details, including the modified title, content, etc. This way, users can see the changes they made reflected in their posts.
const updatePost = async (req, res) => {
  const postId = req.params.postId;
  const { title, content, tags } = req.body;

  try {
    const post = await Post.findByIdAndUpdate(postId, { title, content, tags }, { new: true });
    if (post) {
      res.json({ message: 'Post updated successfully' });
    } else {
      res.status(404).json({ message: 'Post not found' });
    }
  } catch (error) {
    res.status(500).json({ message: 'An error occurred while updating the post' });
  }
};
We use the method findByIdAndUpdate to update the post using the id.
Delete a certain post
In some cases, users may want to remove a blog post entirely. To accommodate this, we have implemented the DELETE /posts/:postId endpoint. By providing the :postId parameter in the URL, users can specify the post they wish to delete.
Upon successful deletion, the endpoint returns a simple JSON response confirming the deletion. This ensures users are aware that their blog post has been removed from the system.
const deletePost = async (req, res) => {
  const postId = req.params.postId;

  try {
    const deletedPost = await Post.findByIdAndDelete(postId);
    if (deletedPost) {
      res.json({ message: 'Post deleted successfully' });
    } else {
      res.status(404).json({ message: 'Post not found' });
    }
  } catch (error) {
    res.status(500).json({ message: 'An error occurred while deleting the post' });
  }
};
We use the method findByIdAndDelete to delete the post from the database.
In postController.js
const Post = require('../models/Post');
const User = require('../models/User');

const createPost = async (req, res) => {
  const { title, content, tags } = req.body;
  const author = req.user.username;
  const user = req.user;
  console.log(user);
  try {
    const post = new Post({ title, content, tags, author });
    await post.save();
    console.log(user._id);
    console.log(user.customId);
    await User.findOneAndUpdate({ username: user.username }, { $push: { posts: post._id } });

    res.json({ message: 'Post created successfully', postId: post._id });
  } catch (error) {
    res.status(500).json({ message: 'An error occurred while creating the post' });
  }
};

const updatePost = async (req, res) => {
  const postId = req.params.postId;
  const { title, content, tags } = req.body;

  try {
    const post = await Post.findByIdAndUpdate(postId, { title, content, tags }, { new: true });
    if (post) {
      res.json({ message: 'Post updated successfully' });
    } else {
      res.status(404).json({ message: 'Post not found' });
    }
  } catch (error) {
    res.status(500).json({ message: 'An error occurred while updating the post' });
  }
};

const deletePost = async (req, res) => {
  const postId = req.params.postId;

  try {
    const deletedPost = await Post.findByIdAndDelete(postId);
    if (deletedPost) {
      res.json({ message: 'Post deleted successfully' });
    } else {
      res.status(404).json({ message: 'Post not found' });
    }
  } catch (error) {
    res.status(500).json({ message: 'An error occurred while deleting the post' });
  }
};

const getAllPosts = async (req, res) => {
  try{
    const posts = await Post.find({});
    res.json({ posts });
  }
  catch(error){
    res.status(500).json({ message: 'An error occurred while fetching the post' });
  }
}

const getById = async (req, res) => {
  const postId = req.params.postId;
  try {
    const post = await Post.findById(postId);
    res.json({ post })
  }
  catch(error){
    res.status(500).json({ message: 'An error occurred while fetching the post' });
  }
}

const getTrendingPosts = async(req, res) => {
  try {
    const trendingPosts = await Post.find({}).sort({ likes: -1 }).limit(5) ;

    res.json({ trendingPosts });
  } catch (error) {
    console.error(error);
    res.status(500).json({ message: 'An error occurred while fetching trending posts' });
  }
}
module.exports = {

  createPost,
  updatePost,
  deletePost,
  getAllPosts,
  getById,
  getTrendingPosts

};
Notice that we have some other functions as well. These are endpoints to get the blog posts. I leave this to you guys to understand them. Try chewing some glass. These are easier so I expect you get it. Feel free to comment down any doubts.
Note:
In getTrendingPosts, const trendingPosts = await Post.find({}).sort({ likes: -1 }).limit(5) ; here "likes" is something we havent yet discussed, I will be discussing it in the next part.
Now in postRoutes.js
const express = require('express');
const postController = require('../controllers/postController');
const { authenticateJwt } = require('../middlewares/authentication');


const router = express.Router();

router.post('/post', authenticateJwt, postController.createPost);
router.put('/post/:postId', authenticateJwt, postController.updatePost);
router.delete('/post/:postId', authenticateJwt, postController.deletePost);
router.get('/post', authenticateJwt, postController.getAllPosts);
router.get('/post/:postId', authenticateJwt, postController.getById);
router.get('/trending', authenticateJwt, postController.getTrendingPosts)

module.exports = router;
Notice router.delete('/post/:postId', authenticateJwt, postController.deletePost); We are using middlewares. I have covered middlewares in my previous blogpost. Please feel free to check that. This middleware is used to to authenticate the user, so that only registered, authorized users can access these specific routes.
Now in app.js
const express = require('express');
const mongoose = require('mongoose');
const authRoutes = require('./routes/authRoutes');
const postRoutes = require('./routes/postRoutes');


const app = express();
const port = 3000;

app.use(express.json());

// MongoDB connection
mongoose.connect('MONGODB_URL', {
  useNewUrlParser: true,
  useUnifiedTopology: true
})


// Routes
app.use('', authRoutes);
app.use('', postRoutes);

app.listen(port, () => {
    console.log(`Server is running on port ${port}`);
  });
Conclusion
We covered adding, updating and deleting blog posts in this article. In the next part, I will be discussing about comments, likes, bookmarks and user profile endpoints. Stay tuned till then :)
